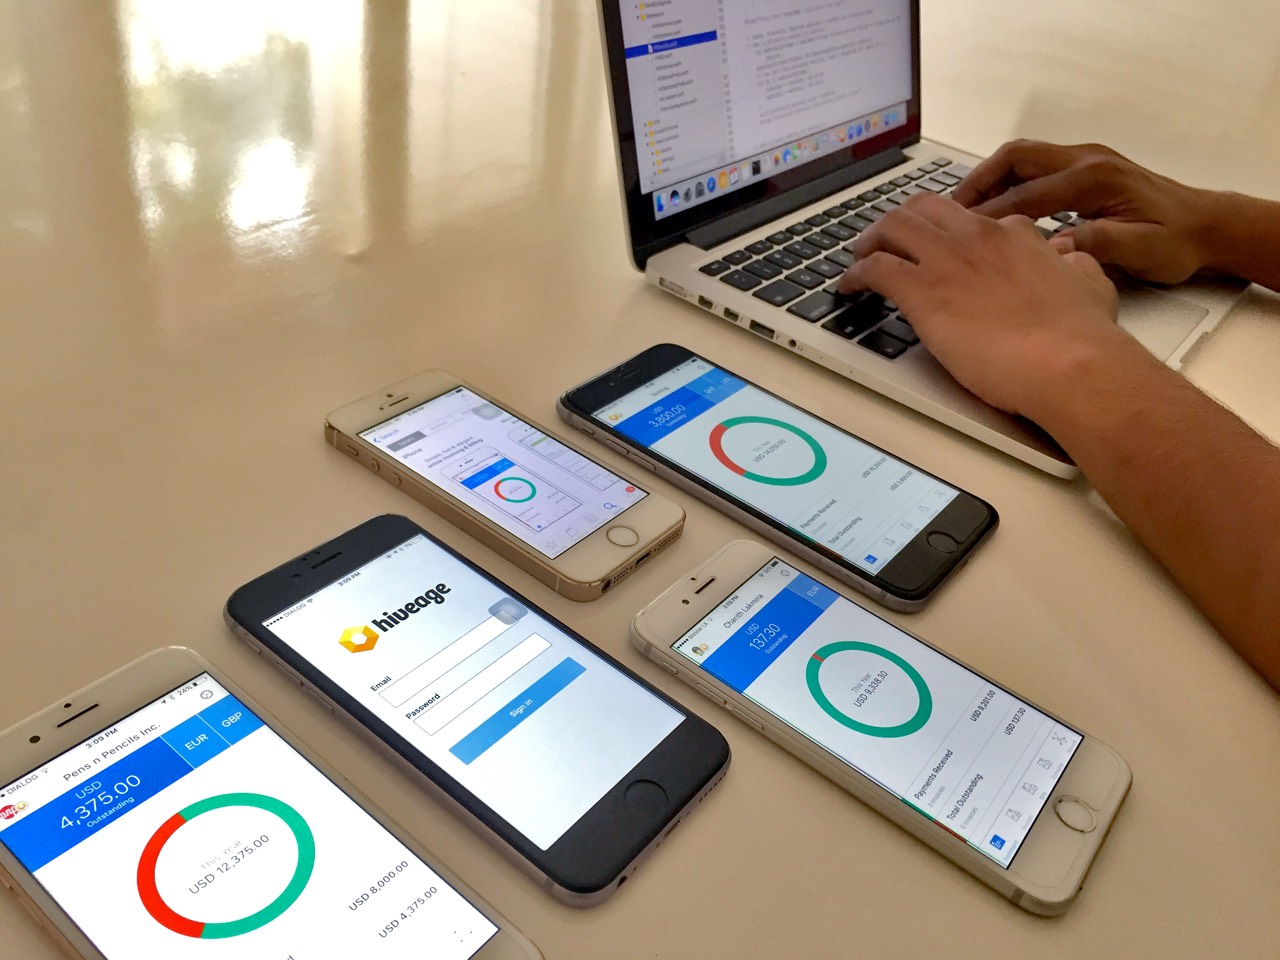
How We Developed the Hiveage iOS App

In the first article of this series, we discussed how the iOS app for our online invoicing service Hiveage was designed. In this article, we will explain how that design became an actual app. As a software-as-a-service with thousands of active users from more than 140 countries around the world, it was important that our mobile app was as reliable, stable and fast as our web app. I am the lead engineer of this project, and my aim is to offer you an inside look at the decisions that went into making sure our iOS app was built to those exacting standards.
React Native or Real Native?
The Vesess team has ample experience with JavaScript, and we could have used React Native with JavaScript to build the native app, in a relatively quick time. But we always wanted to bring our mobile users the “at home” feeling and smoothness of using a native app, which would be somewhat lacking even in a carefully architectured React Native app.
JavaScript code is not as efficient as Swift or Objective-C in calculation intensive tasks in mobile. There is also a slight overhead when JavaScript is controlling native elements. In terms of performance, React Native lags behind an optimized native application. As we always care about bringing forth the best possible experience with Hiveage, we had no hesitation with moving towards Apple’s Xcode SDK with native code when developing our core product for iOS devices.
ObjC or Swift?
While I led the engineering efforts on the app, we also assigned two more members of the team to the project who were completely new to iOS development. One of the first decisions we had to make was what language is to be used.
I’ve been doing iOS development since its early releases starting from late 2008, and my language of choice for years was ObjC. However, by this time I was gradually using Swift in parts of my ObjC projects. After weighing our options, I decided to use Swift, and instructed my two mentees to start with Swift instead of spending their valuable time wading through ObjC docs. I prepared an introductory presentation about beginning iOS development for them.
The simplest reason for our language selection was that Apple was gradually moving all their guides to Swift, shifting their support towards Swift and also making it open source. For example, if you take a look at the tvOS Programming Guide, even though you could code in ObjC, the guides only have sample codes from Swift.
Apple itself has several reasons to push for this migration: Swift code is faster and easier to maintain, and it is easier to read and requires a lesser amount of code to achieve the same goal as compared to ObjC. These factors only made the decision easier for us.
Beginning Development
Even before the app design was finalized, our young development team had been perusing the guides, including Human Interface Guidelines, Swift Programming Guide, App Store Review Guidelines and iOS App Programming Guide. In parallel, I also initiated the core iOS project setup for them to continue with.
We decided to use both Carthage and Cocoapods from initial setup to manage third party libraries we use in-app, because Carthage support was minimum for some of the third party libraries. When we wanted to change a third party library by forking and then use the forked code from a particular branch, it was easier to use podfile.
From the initial setup we have used Alamofire and SwiftyJSON. Instead of directly using Alamofire or SwiftyJSON inside controllers, they were used inside the Request classes. And we followed the same practice of not exposing any third party code into Hiveage core, as it gives us the flexibility of switching from one third party code to another in the future without affecting our Hiveage core app.
Our common request class HVRequest, which is the base class for all hiveage requests, looks like this:
https://gist.github.com/tharindu/72c709e9a0d330ef8154321dea548da4
And our Hiveage project structure with folders looks like this:
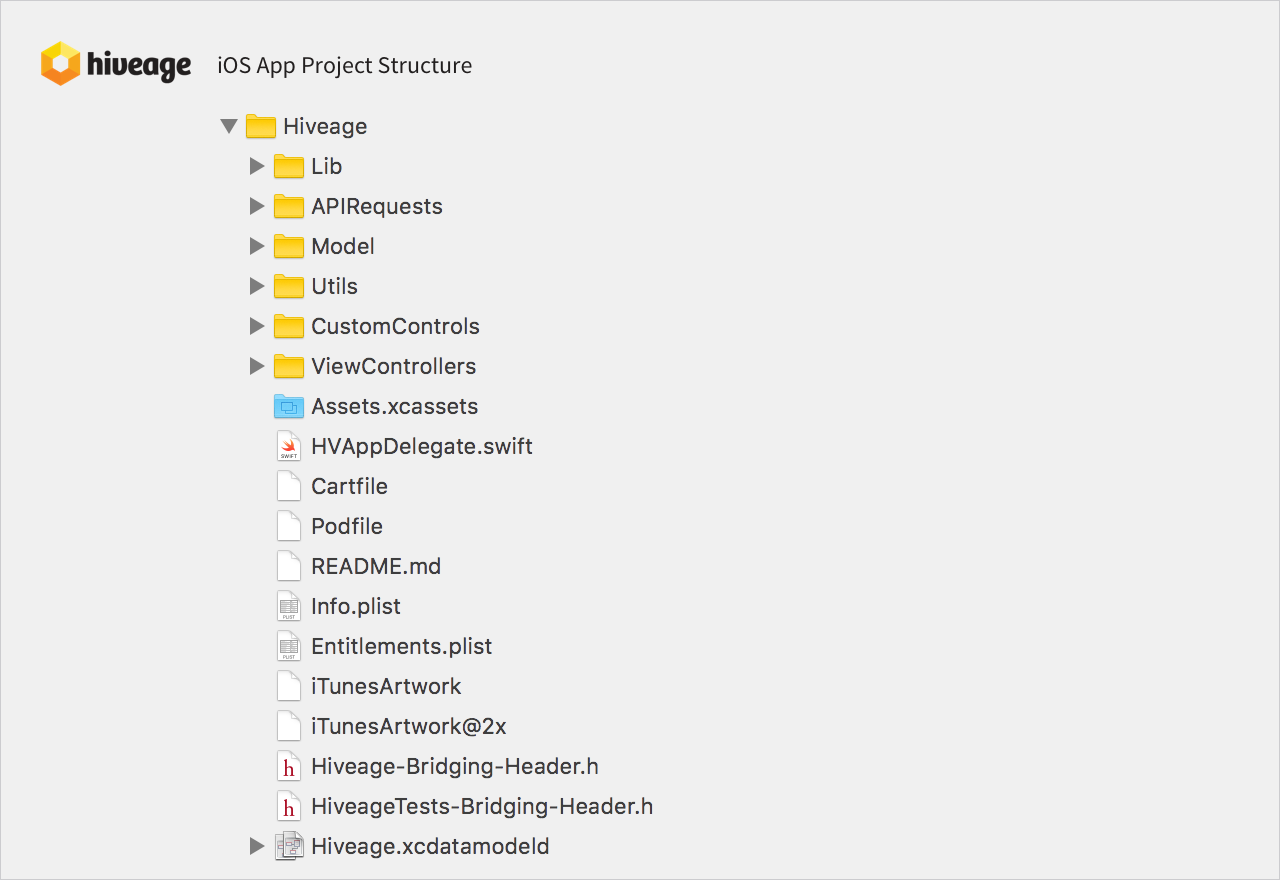
| Lib | Any minor third party code with one or two files that won’t be included via Carthage or Cocoapods |
| API Requests | App network layer code with Hiveage API communication |
| Model | Data model objects for MVC architecture |
| Utils | Configuration files, wrapper classes, helper classes or extensions |
| CustomControls | Our own custom control implementations |
| ViewControllers | View Controllers and view XIBs for MVC architecture |
| Assets.xcassets | App Images and Icons are added to assets catalog |
| Cartfile, Podfile | Dependency manager files for Carthage and Cocoapods |
| README.md | Readme file with mark down syntax |
| Hiveage-Bridging-Header.h, HiveageTests-Bridging-Header.h | Bridging header files for Hiveage and Tests targets to use ObjC libraries via Swift |
| Hiveage.xcdatamodeld | Data model object with entities and relationships for CoreData |
Development Process
Our mobile app development services team continued the project from there onwards. Throughout the development process, we gave a high priority to writing unit tests for each and every request and core logic calculation. As a financial app, Hiveage cannot afford to make any errors with the data or calculations, and we also wanted to make sure the app would not crash even with heavy usage.
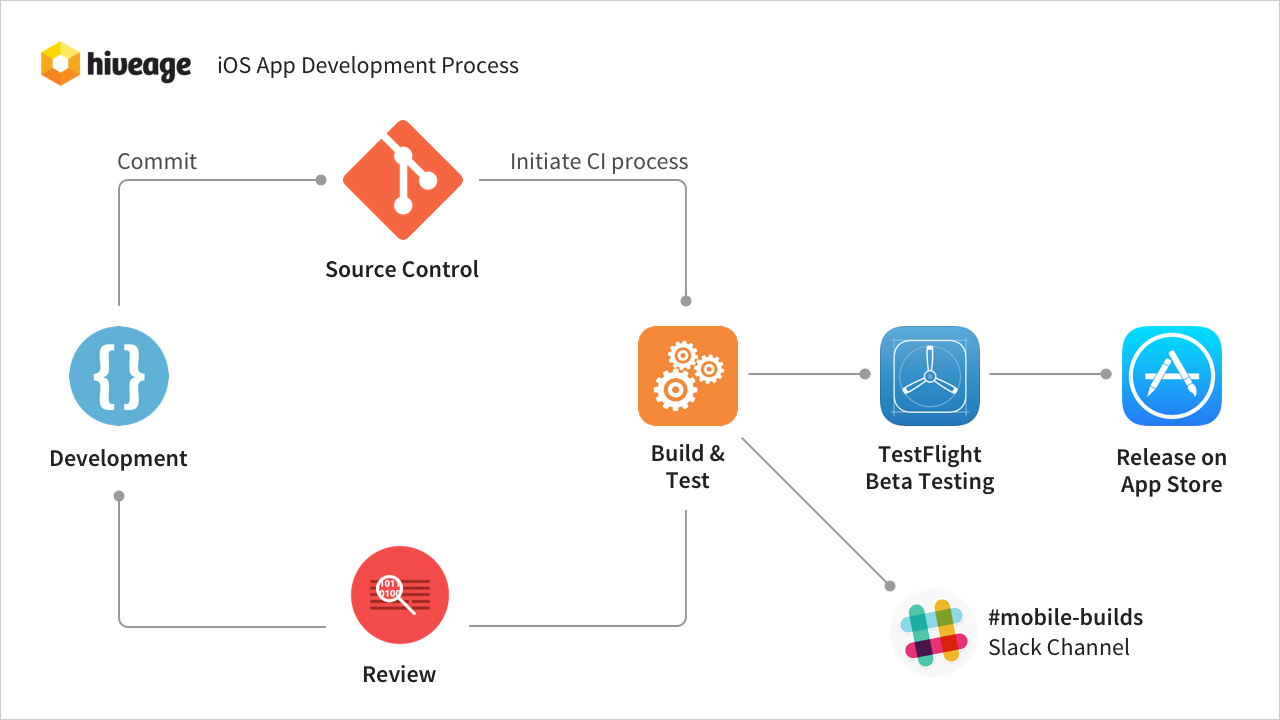
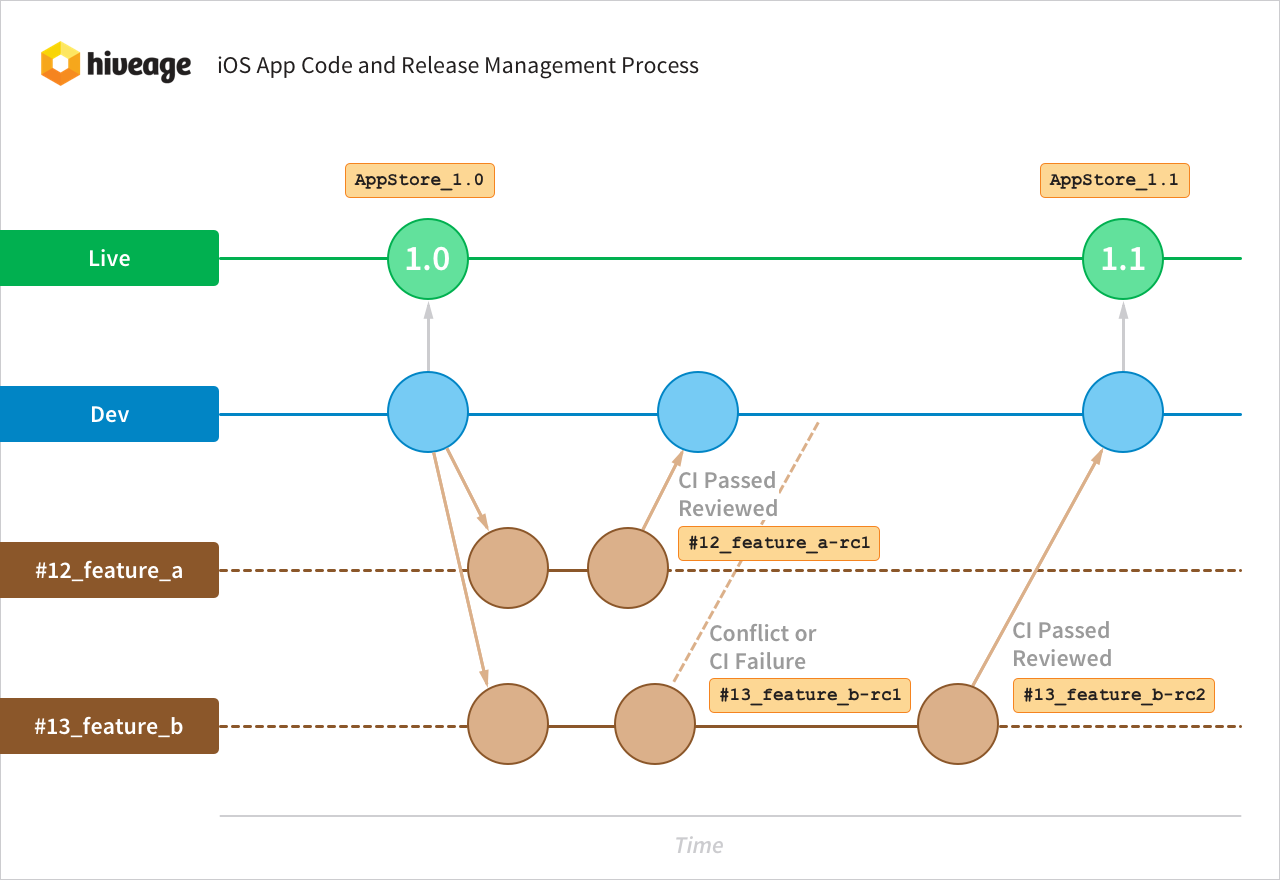
We are using GitLab as our source code management tool, and inbuilt GitLab CI to support continuous integration workflows. We manage master and dev branches and use a simple process for developing and reviewing features. Dev branch is the active development branch with stable code, whereas the master branch holds the release code with tags created off master, such as AppStore_1.0, AppStore_1.1.
When developing a feature or fixing a bug, a new branch is created off dev with a name like #[ticket_no]_feature_name. After the feature is completed, the feature branch is rebased with dev squashing minor commits and we create a new release candidate branch #[ticket_no]_feature_name-rc[number].
As we want to keep the commit history clear, we squash minor commits such as removing dead code, changing comments or renaming a folder. With the new branch created, the next step is to create a merge request with the target branch as dev. At this stage our CI will run and check if all tests are passed: if the tests are failing, the merge request is not eligible to be merged into the dev. We also use Slack webhooks integration to notify our #mobile-builds channel about any CI failures.
Then I will review the code and use GitLab Merge Request comments to add minor notes or create separate ticket to be fixed as MR #{number} Review Notes. In the meantime, if another feature branch merges into dev that conflicts with the previous merge request, we will close the original merge request to create a new merge request. For this new merge request, we rebase the feature branch with dev again and create a new branch with the name #[ticket_no]_feature_name-rc[number+1]. It will be reviewed again and merged to the dev only if CI passed successfully. Likewise after a main feature is merged into dev we create a TestFlight build at least weekly for internal testing.
Engineering Concerns
The following are some additional points we considered when preparing our Hiveage iOS App releases:
Even though our code is written in Swift, we needed to integrate a couple of third party libraries written in Objective-C. For that we have included a bridging header with library import and simply used the third party ObjC library using Swift syntax as in the following Apple guide.
We always cared about our app size, as we wanted to make it downloadable even over Cellular Data or Wi-Fi. At one point we used Realm over CoreData simply because of the ease of coding. However, this change resulted in a significant increase in our weekly TestFlight build size. Therefore we looked into an alternative and first decided to use CoreData, but then came up with an even simpler solution: hide the complexity of CoreData usage with Magical Record, which follows the Active Record design Pattern.
In addition to that, migrating to Swift 3 included some work because, by the time we wanted to make the switch to the latest syntax, some of the third party code we used was still on Swift 2.3 or Swift 2. We managed to do this by forking some third party libraries on our own and editing them, and pointing our podfile to them.
What’s Next
Our plan was to quickly bring an initial version of the Hiveage app with minimum features into the AppStore (as they say at Facebook, “done is better than perfect”), and thereafter continuously release updates every month with the features on our roadmap. I’m glad that we were able to bring 5 more releases into AppStore since our initial release on 23rd June, 2016.
The Hiveage iOS App is still in an active development cycle and our roadmap includes estimates, bills, managing multiple businesses, tracking time, expense and mileage, and offline support as features to go live in the coming months. Eventually the iOS app will be as powerful as our web app. We also have some cool features planned specifically for the mobile app—Stay tuned to our blog for more details on how we will design and develop them.